Showing posts with label cricut. Show all posts

Friday, April 25, 2014

New Card Creations

Hello to all the beautiful paper crafters and paper craft lovers out there!  I have been busy working on some more cards and I wanted to share them with you.  J  As always if you have a question about how I have made something or are interested in Close to my Heart products I am only a message away.  All of these cards are available for $4.00 a piece or 3 for $10 in my Etsy Store Love Manifested.   


Well thanks for checking out my creations.  If you feel like sharing your creations feel free to post pics below.  Happy crafting all! 
XOXO
:)  Amanda

Saturday, November 16, 2013

Chillin...


Hi all!  I hope everyone is having a great Novemeber so far.  I certainly am.  I had a chance to sit down and create a winter layout the other day and I wanted to share it with you all.  I hope you enjoy.  :)


For this layout I created a 2 page 12x12 layout.  The supplies I used include:
Various left over bling in my stash


First I picked out a layout design from the design guide I was interested in working with.  Then I cut the paper according to the measurements in the design guide.  I adhered the paper and decided I wanted to stamp some snowflakes sporatically (in seconnd generation Twilight).  I stamped the title.  Next I cut out the two snowflakes from the Art Philosophy Cricut cartridge in size 1 and 3/4 inch as indicated on the Snowflakes CTMH stamp set.  I stamped them and attached the bling.  I attached the stamped snowflake die cuts with 3d adhesive foam.  Last step I added some left over bling and bling swirls.  And here you go. 


I like how this layout turned out.  You may not think I will have any cold weather here in FL.  Let me assure you this is my first winter 8 hours north of where I used to live in FL.  I am ALREADY expereincing cold I am not used to lol!
Well my friends I hope you find the time this month to craft some great things!
XOXO
:) Amanda

Thursday, October 31, 2013

Damask Divas November Blog Hop - Huntington

If you came from Cydney Fowler's blog then you are in the right place.  If you have jumped here and just discovered our blog hop, feel free to check the list at Damask Divas blog Damask Divas Blog to find the complete list of blog hop participants.


Hi my fellow scrapbook fans!  This month with the Huntington paper pack I decided to make a festive 2 page 8x8 Thanksgiving layout.  I hope you enjoy it. :)


The supplies I used: 
Orange Gems
Thin Brown Ribbon 


First thing I inked my pages and then cut all the different pieces.  I then used the scallop border punch and stamped my images.  I adhered everything and added the embellishements.  Much quicker and faster then preparing any Thanksgiving food lol! 


Well, you made it to the end of this month's hop.  We hope you had as much fun browsing our creations made with the Surf's Up Paper as we had making them!  If you would like to check things out again just hop on over to Damask Divas Blog for the complete list of blogs. Thanks so much for hopping with us--now go get your crafty on!
XOXO Happy crafting!
:) Amanda

Saturday, September 28, 2013

Giveaway Time!!!

It is just about October and I LOVE LOVE LOVE October!!!  It is the month I am born in and it has Halloween!  Fun stuff for sure!  So for all my fellow paper craft lovers I am having a giveaway!  I have some fun stuff I will be giving away. :)  I am giving away a four pack of handmade birthday cards made by yours truly.


Each card comes with a matching envelop.  The inside of the cards are blank so you can write a personalized note or attach a gift card if you like.  


Everyone can use birthday cards!  There are a few different ways you can enter to win.  Check it out the ways to enter below.  

a Rafflecopter giveaway

More fall fun - 
I have an extra giveaway for anyone who places an order on my Close to My Heart website through the Please Place Orders Here :) link from now until Oct 15th.  If you place an order through the Please Place Orders Here :) link from now until Oct 15th you will be entered in to win the Sweet Life stamp set!!!  There is no minimum purchase just a purchase through the link from now until Oct 15th and you are entered!  :) Here is a pic of the Sweet Life stamp set that one lucky person will be winning. 


One more thing to celebrate October - I am offering $10 off ANY Cricut bundle purchased from me from now until October 15th.  Since this is a personal sale I am offering you must purchase this directly from me and here is how:

1. Email me at - LoveManifested22@gmail.com
2. Indicate which bundle you would like ($10 off each bundle so you can buy all three and save $30 if you would like).  
3. Provide me with your email address. 

With those 3 things I will send you a PayPal invoice.  When I receive your payment by Oct 15th or sooner your Cricut bundle will be ordered.  Any one who purchases the Cricut bundle in this way will also be entered to win the Sweet Life stamp set.

 
Artbooking Collection (1st on left) Artiste Collection (2nd) Art Philosophy Collection (bottom)

Good luck to all and happy crafting!
XOXO
:) Amanda

Friday, September 27, 2013

Damask Divas October Blog Hop - Laughing Lola

If you came from Tracey Caudle"s blog then you are in the right place.  If you have jumped here and just discovered our blog hop, feel free to check the list at Damask Divas blog Damask Divas Blog to find the complete list of blog hop participants.

Hi all!  I’m so psyched it is one of my favorite times of year.  Halloween time!  :)  So for my Laughing Lola creation I made an 8x8 2 page layout.  I hope you find it to be spooktacular!!!  ;)  


The supplies I used include:

Cricut Pumpkin Carvings Cartridge
Monster Google Eyes from Hobby Lobby


First I cut all my paper and cricut designs.  All the cricut designs are cut at 2 and 1/2 inches.  After that I stamped my images, assembled, and aheared everything.  That easy!


Well I hope you enjoyed my festive Halloween layout!  I wish everyone a Happy Halloween!!!

The next blog on the list is Hilary Harris's blog.
Hope you have a great time on our hop and checking out all the creations using Laughing Lola. If you get lost, just hop on over to Damask Divas Blog for the complete list.
XOXO Happy crafting!
:) Amanda

Monday, July 1, 2013

July's Fun Deals!

Hi all!  Close to My heart has A LOT of things going on right now.  We are going to be offering an all new Cricut Bundle called Circut Artbooking starting in the month of August!!!  Here is a sneak peak picture:

 
 Expect the best as you know that is all that Close to My Heart brings!  Also we have an all new Idea Book coming out in August.  It is AWESOME!  :) 

Now for the happenings for this month - I am totally psyched because this month Close to My Heart has the Canvas Workshop on the Go Kit on sale for 50% off!!!  I am totally taking advantage of this deal!   


Here are the details of the sale:
Get the discounted Workshops on the Go® canvas art kit in July—no qualifying purchase required! From July 1 to July 31 you can get this trendy kit to create your own canvas art to hang in your home, regularly priced at $39.95, now discounted to $19.95—more than 50% off! Take papercrafting to the next level with this adorable home décor piece that you can display for all to see.
Dates: Offer valid July 1–July 31, 2013.


Great stuff!  I am also placing Circut Artiste Bundles on sale for this month only for $89.00 in my Etsy store Love Manifested.  To take advantage of this sweet deal order here:
Buy Circut Artiste Bundle for $89!
Also available at my Etsy store is the Beach Fun chipboard album.  If interested in the album order here:
Buy Beach Fun Mini Album


We can not forget the stamp of the month for July - Sweet Life!   Each month you can enjoy a new D-size stamp set, available for one month only, for just $5—that’s over 70% off retail! When you place an order of $50 or more in Close To My Heart products, you qualify for this special Stamp of the Month pricing.


Another fun thing I am doing this month, if you sign up to do a party with me for the month of August (virtual or home party), you will receive a Petite Perks stamp set along with a 1x1 inch block!  Your party does not have to have any minimum sales to receive this.  Just having a party with me during the month of August 2013 will get you this stamp set for free.  Of course you still get to have all the hostess perks of:   

When Your Gathering Sales Reach:Reward Yourself with selected Close To My Heart Products*:And choose your Hostess Rewards Plus! option(s) from any Idea Book item or the Hostess Collection
$1,050 or more $200 or more** in free products AND select up to 4 items in the current Idea Book at 50% off
$950–$1,049 $180 in free product AND select up to 4 items in the current Idea Book at 50% off
$850–$949 $160 in free product AND select up to 4 items in the current Idea Book at 50% off
$750–$849 $140 in free product AND select up to 3 items in the current Idea Book at 50% off
$650–$749 $120 in free product AND select up to 3 items in the current Idea Book at 50% off
$550–$649 $100 in free product AND select up to 2 items in the current Idea Book at 50% off
$450–$549 $80 in free product AND select any 2 item in the current Idea Book at 50% off
$350–$449 $60 in free product AND select any 1 item in the current Idea Book at 50% off
$250–$349 $40 in free product AND select any 1 item in the current Idea Book at 50% off
$150–$249 $25 in free product

Please note: Hostess Rewards are redeemed at full price. An order total must reach $150 in sales, exclusive of shipping, handling, and tax, to qualify for our Hostess Rewards program. In the US, tax is collected on Hostess Rewards free products based on full retail price. Tax is collected on discounted items based on discounted price. Tax rules are subject to change. Promotions such as Stamp of the Month and other specials are not eligible as Hostess Rewards. Free shipping and handling apply only on Hostess Rewards and Hostess Rewards Plus! items.

Your selection of products for your Hostess Rewards includes these choices:

*Hostess Rewards select product credits are redeemable for My Acrylix® Stamps, My Acrylix® blocks, Exclusive Inks® pads, Exclusive Inks® marker sets, Exclusive Inks® re-inkers, My Stickease® assortments, Complements, My Reflections® paper packets, all cardstock packs, Workshops on the Go® kits, Studio J® one layout (retail value $6.50, SJ1001), and Studio J 5-packs.
**For each $100 in sales over $1,050, add an additional $20 in free products.

  
All right so those are the sales and deals I have going on for this month.  Fun stuff for sure!  If you are interested just send me an email at LoveManifested22@gmail.com 
Thanks for your time!  Craft on my little crafty ninjas! 
:) Amanda

<a href="http://www.hypersmash.com">HyperSmash.com</a>
 

Friday, June 14, 2013

Festive Friday - Festive Flags


Today is
Cricut Design Team Festive Friday – Festive Flags!


Welcome everyone!  Glad you could join me today for the daily project for My Cricut Craft Room.  http://mycricutcraftroom.blogspot.com/

Today’s theme is Festive Flags.  I choose to create a custom invite for a 4th of July fun, festive, party! 


Supplies used: Cricut Summer Celebrations and Tie the Knot cartridges, red and blue cardstock, black Queen and Co Goosebumps, Close to My Heart star spangled blue ink, and CTMH Atomic Lower Case


The how to: First I cut the flag pattern and 4th of July out of the Summer Celebrations cartridge.  I cut the word Celebrate from the Tie the Knot cartridge.  I adhered the word Celebrate to the white piece of cardstock, inked the edges in blue ink, and attached it to the card with 3D foam.  I then adhered the blue part of the flag to the red part, attached that to the front of the card, and then adhered the 4th of July to the inside of the card.  The next step is to cut a piece of red cardstock to the size of  4 x 5 1/2 inches and cut the white piece of cardstock to 3 x 4 1/2 inches.  I stamped the time, place, rsvp and then adhered the two pieces of cardstock.  The last step is to create teh blue around 4 th of July.  To do that I used a stipple brush and blotted it onto the ink pad and then dabbed it into the card.  And there you go a great invite for this years festivities!     

Thanks for taking the time to stop by!  If you'd like to see more awesome Festive Flag cards please visit the MCCR blog at http://www.mycricutcraftroom.blogspot.com.

XOXO :) Amanda     .    


Saturday, June 8, 2013

June 100 Cricut Cartridge Blog Hop


June's 100 Cricut Cartridge Blog Hop 
You should have started at http://mycricutcraftroom.blogspot.com/ if not please start at the beginning. :)
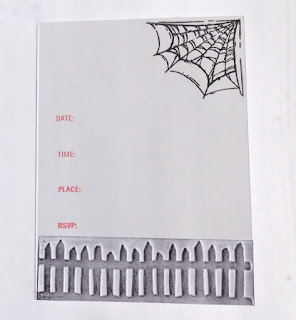
Welcome everyone!  I’m excited to show you what I can up with for this month’s blog hop.  I used 6 different Cricut cartridges and made 6 different projects.  The first project I would like to show you is a party invite I made using Frightful Affair.  


Supplies used: Cricut Frightful Affair cartridge, Paper Studios cobweb embossing folder, Jim Holtz fence embossing folder, Die Cuts with a View Metallic cardstock, red and black Close to My Heart inks, Close to My Heart Swirl Stroke lowercase, Happy Hauntings (retired), and Art Philosophy Celebrations stamp sets, mini google eyes


 The how to: I cut the metallic cardstock ¼ inch smaller than the card, embossed it with the cobweb pattern, and then sanded it.  I cut the zombie and zombie layers from Frightful Affair.  I then stamped You’re Invited and cut the stamped image in a rectangle.  I inked the edges of the rectangle to give it a bloody look.  I put together the zombie (his bloody knee piece I put on the opposite side then indicated in the handbook since I knew the you’re invited sign would cover it up).  I then outlined his mouth with a black pen and attached the google eyes.  Next step step was to adhere everything to the card.  next I embossed the fence on white cardstock and inked with a sponge the embossed fence with black ink.  I then stamped the info inside the card and attached the fence to the bottom of the card. 
***Note - If there is anyone who doesn't know how to ink edges of paper or with a sponge just leave a comment letting me know that and I will create a video blog entry to show you how.  :)


~~~~~~~~~~~~~~~~~~~~~~~~~~~~~~~~~~~~~~~~~~~~~~~~~~~~~~~~~~~~~~~~~~~~~~~~~

The next project I completed was a super easy and quick Christmas card.


  Supplies used: Cricut Close to My Heart Art Philosophy cartridge, silver stickles, CTMH red and green inks, CTMH Ornamental Cheer stamp set, silver ribbon

 
The how to:  I cut a piece of black cardstock to fit the front of the card.  Then I cut the ornament shape from the CTMH Art Philosophy cartridge (3 inch size as indicated on the CTMH Ornamental Cheer stamp set).  After that I stamped the ornament with the coordinating stamp from the Ornamental cheer stamp set.  The next step was to cut a small piece of silver ribbon and tie a little knot in it.  I cut another piece of ribbon that I used to make it look like the ornament is hanging on the front of the card.  I then attached the ornament and ribbon.  The last step was to add silver stickles to make it pop.  I applied the silver stickles by putting a small amount on a paper towel and then blotting it onto the card around the ornament and ribbon.  I stamped the inside of the card with the sediment “Wishing you a holiday filled with joy.”  This sediment stamp is also on Ornamental Cheer from CTMH.  This card is easy and quick to make.  Perfect design for making many for the Christmas season! 


~~~~~~~~~~~~~~~~~~~~~~~~~~~~~~~~~~~~~~~~~~~~~~~~~~~~~~~~~~~~~~~~~~~~~~~~~
My third project I created for this hop is a birthday card for a great friend.
Supplies used: The Hoot and Hollar Cricut Cartridge, large orange gem, Queen and Co Twinkle Goosebumps - green, CTMH Just a Number stamp set, star spangled blue ink, and google eyes 


The how to: First I cut out the adorable owl and assembled him.  Instead of using the belly for the owl on the cartridge I used a felt flower (this came from my stash and I am not sure who makes it sorry).  I put a gem inside the middle of the flower.  I then added google eyes (I like to use google eyes I think they make a project come alive).  I cut the white piece of cardstock and stamped the sediment “With age comes wisdom…”.  For the inside of the card I cut a piece of white cardstock a 1/4 an inch smaller then the card.  I inked the edges and then stamped the sediment "You are one of the wisest people I know."  The perfect card for a great friend!      

~~~~~~~~~~~~~~~~~~~~~~~~~~~~~~~~~~~~~~~~~~~~~~~~~~~~~~~~~~~~~~~~~~~~~~~~

For my next creation I made a card for newlyweds (a subject I am loving since I recently tied the knot myself).  


Supplies used: Tie the Knot Cricut cartridge, CTMH Kraft card,  Paper Studio embossing folder,For Always CTMH paper pack, Love You and Adorable Backgrounds stamp sets (both retired), CTMH red sparkles, CTMH red ink, and Queen and Co Rhinestone Trios in black.


The how to:
First I cut the paper pieces for the card from the patterned paper and adhered them.  Next I cut the heart from the Tie the Knot cartridge.  Then I embossed the heart with the love embossing folder and sanded it down.  I followed that with stamping the adorable background pattern on the card flap.  Next step attach the heart with 3-d foam adhesive and I added black gems to the background pattern on the card flap.  Next I cut the white cardstock for the inside of the card.  I stamped the white cardstock and adhered it to the inside of the card.  Last steps are to cut the Mr & Mrs from red cardstock, ran it through my Xyron, and attached it to the envelop.  


~~~~~~~~~~~~~~~~~~~~~~~~~~~~~~~~~~~~~~~~~~~~~~~~~~~~~~~~~~~~~~~~~~~~~~~~
 
 Next project is a special way to say congrats to all those Grads out there!


Supplies used:Cricut Something to Celebrate cartridge,  Die Cuts with a View Shimmer cardstock, glitter cardstock, black cardstock, Scrapbooking Adhesives photo corners, silver decorative dots, and Close to My Heart Casual Expressions stamp set


First step for this card I cut the gray metallic cardstock back ground.  It is 1/4th an inch smaller than the card.  The next step I used the Something to Celebrate cartridge to cut the mortar board shape.  I used glitter cardstock to cut the top of the mortar board and regular black card stock for the bottom part.  It was a bit tough to catch on camera to show you.  I did this to give it a bit of extra depth.  I assembled the mortar board pieces.  I then stamped congratulations on white cardstock and cut it down to the rectangle.  I adhered the gray metallic cardstock, attached the photo corners, and adhered the stamped congratulations image.  I then added the silver decorative dots.  I adhered the mortar board with foam adhesive to give it more depth.  That easy!


~~~~~~~~~~~~~~~~~~~~~~~~~~~~~~~~~~~~~~~~~~~~~~~~~~~~~~~~~~~~~~~~~~~~~~~~~

My last project for you to check out today is for all the cat lovers out there.  This is a birthday card from your cat. :)
Supplies I used: Cricut celebrations cartridge, Cuttlebug Happy Birthday embossing folder, CTMH Meow (retired) and Perfect fit Birthday stamp sets, 4 mini pewter brads, Bazzill Bling blue and google eyes
 The how to: First I cut the green piece just a ¼ inch smaller than the card.  Then I embossed the green piece with the Happy birthday design and adhered it to the card.  I then cut the cat face and pieces.  I put the cat together outlining the cut detail in black marker, attached google eyes, and then attached the cat to the bling cardstock.  I attached the bling cardstock to the white cardstock, put the brads in the corners, and adhered the box with the cat face with 3d foam adhesive.  The last step was to stamp Happy birthday and the paw print on the inside of the card.  My idea was you can write the cats name next to the paw print.  :)

  
Well I hope you enjoyed my creations for this month.  Remember you can just shoot me an email if you ever have questions about my creations.  

Next on the blog hop is: Dee at - http://craftfavorites.com

In case you get turned around the entire lineup for the blog hop is:

Thanks for taking the time to stop by.  Happy crafting all!
XOXO :) Amanda